A covered strangle combines a stock position with a short strangle around it: own 100 shares, sell an out-of-the-money call, and sell an out-of-the-money put. The call is covered by the shares; the put is a standing commitment to buy 100 more at the lower strike. The structure collects roughly double a covered call’s premium in exchange for doubling your downside delta if the stock falls through the put strike — it is a conviction trade dressed as an income trade.
Key Takeaways
- The covered strangle = long 100 shares + short OTM call + short OTM put, collecting two premiums against one stock position.
- Max profit arrives above the call strike: share gains to the strike plus both premiums, with the shares called away.
- Below the put strike you lose on the shares and get assigned 100 more — downside delta effectively doubles exactly when the stock is falling.
- It suits investors who genuinely want more shares at the put strike; the premium is compensation for that commitment, not free income.
How the Covered Strangle Works
Start from a covered call: shares plus a short call, income in exchange for a capped upside. The covered strangle adds a second income leg — a short put below the market. Because the put is cash- or margin-secured rather than covered by shares, the broker treats it like any short put: a commitment to buy 100 shares at the strike if assigned.
The position now profits in a wide band. If the stock sits still, both options decay and you keep two premiums. If it rallies through the call strike, you deliver the shares at a profit plus both premiums. If it dips modestly, the premiums cushion the drawdown. Only a decisive break below the put strike turns the trade painful — and there it turns painful twice as fast, because the short put’s delta stacks on top of the shares’ as the decline deepens.
This is the wheel player’s acceleration lane: instead of waiting for assignment to start a covered call, or waiting for shares to be called away to sell a put, the covered strangle runs both sides at once around an existing position.
Example
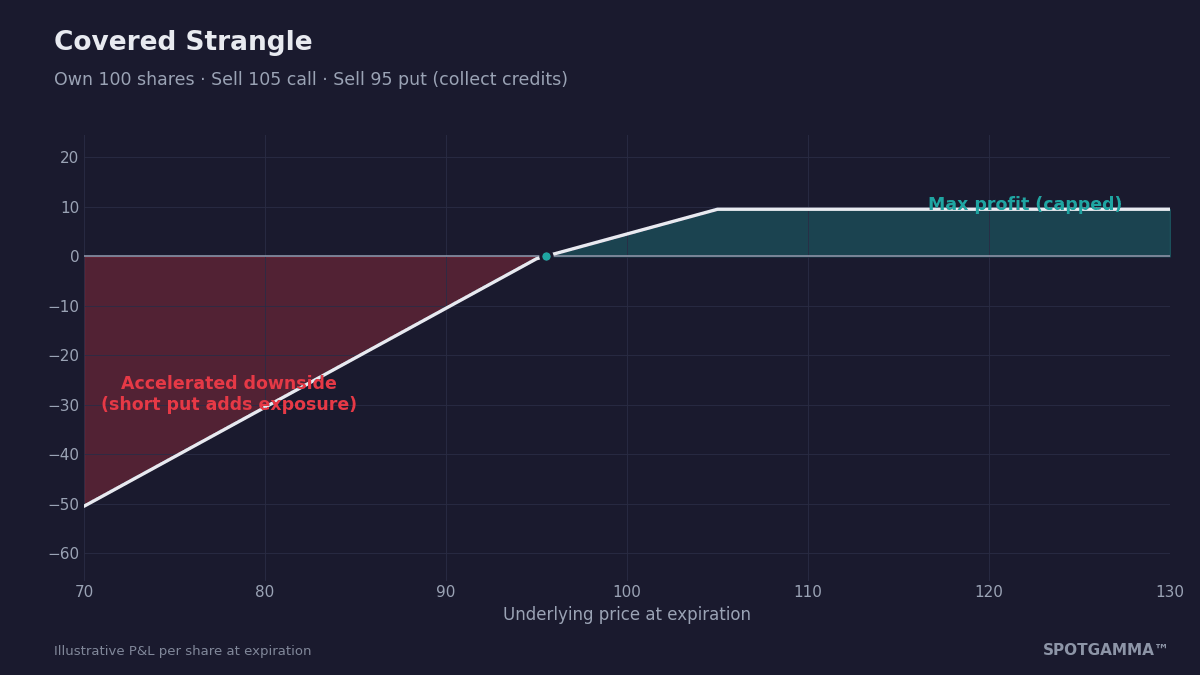
With the stock at $100:
- Own 100 shares.
- Sell 1× the 105 call and 1× the 95 put.
- Total credit: $4.50 ($450).
The outcomes at expiration:
- Above 105: max profit — $500 of share appreciation plus the $450 credit, $950 total, with the shares called away at 105.
- Between 95 and 105: both options expire worthless; you keep the $450 and the shares, having lowered your effective basis.
- Below 95: you are losing on 100 shares from $100 and buying 100 more at 95. At $90, the original shares are down $1,000, the assigned shares $500, offset by $450 of premium — and from here you hold 200 shares of a falling stock.
Stress the full three-leg position — shares included — in SpotGamma’s free Options Calculator to see how quickly delta builds below the put strike.
Covered Strangle vs. Covered Call, Wheel, and Jade Lizard
- Vs. the covered call: same upside cap, roughly double the income — paid for with the short put’s obligation. The covered call’s worst case is owning 100 falling shares; the covered strangle’s is owning 200.
- Vs. the wheel: the wheel sequences short puts and covered calls one at a time; the covered strangle runs both phases simultaneously — faster premium collection, faster size accumulation in a decline.
- Vs. the jade lizard: the lizard caps its upside leg with a call spread and holds no shares, eliminating upside risk entirely; the covered strangle uses stock as the cover and keeps full share participation up to the call strike.
Using Positioning Data to Trade It Better
Strike discipline is the entire game — two strikes, two obligations. The dealer positioning map gives both a data anchor. This post is part of our options strategy library:
- Sell the call at the Call Wall. The Call Wall marks the strike where concentrated dealer gamma has historically stalled rallies — placing the covered call there means capping your shares at the level where hedging flows already resist further upside.
- Sell the put below the Put Wall. The Put Wall is the strike where heavy put gamma tends to slow declines; a short put beneath it sits behind the market’s structural support rather than in front of it.
- Treat the gamma regime as a risk dial. Positive GEX regimes dampen moves and favor range-income structures like this; a flip to negative gamma — where hedging amplifies selloffs — is the signal to reduce the short put exposure, not to add to it.
Risks
- Accelerated downside. Below the put strike you lose on double the shares. A sharp decline hits the position roughly twice as hard as a plain covered call.
- Capital commitment on assignment. The short put requires the cash or margin to actually buy 100 more shares — committed at exactly the moment the stock looks worst.
- Capped upside. A monster rally pays you max profit and no more; the opportunity cost is real in strong uptrends.
- Early assignment. Either short leg can be assigned ahead of schedule — the call around ex-dividend dates, the put when deep in-the-money.
FAQ
How is a covered strangle different from a covered call?
It adds a short OTM put to the covered call, roughly doubling the premium collected. The cost is a second obligation: if the stock falls through the put strike, you buy 100 more shares, so the downside is materially larger than a covered call’s.
What happens below the short put strike?
You take losses on your existing shares and are assigned 100 more at the put strike, doubling your share count in a falling stock. The two premiums cushion the first few dollars of decline, after which losses accrue at double the rate of stock alone.
Who should use covered strangles?
Investors with genuine conviction who would happily buy more shares at the put strike and happily sell their position at the call strike — and who have the capital reserved for assignment. It is a poor fit for anyone treating the second premium as risk-free yield.
This article is for educational purposes only and is not financial advice. Options involve substantial risk and are not suitable for all investors.