A broken wing butterfly (BWB) is a butterfly spread with one wing placed farther from the body than the other — “skipping” a strike — so the extra credit from the wider wing finances the trade down to zero cost or better. The payoff keeps the butterfly’s signature profit peak at the middle strike, but the asymmetry relocates all the risk to one side. A call BWB built above the market can profit at a pinned strike, lose nothing if the stock falls, and carry its only risk zone beyond the far wing.
Key Takeaways
- Same skeleton as a butterfly — buy one, sell two, buy one — but the far wing is set wider, e.g. 100/105/115 instead of 100/105/110.
- The wider wing collects more premium, which is what pays for the trade: a well-built BWB costs roughly nothing.
- With a near-zero cost call BWB, a falling or flat stock loses essentially nothing — one entire side of the payoff is flat.
- All of the risk is concentrated between the short strikes and the far wing — placement of that zone is the whole trade.
How the Broken Wing Butterfly Works
A standard long butterfly is a cheap bet that the stock finishes at the middle strike: you pay a small debit, and that debit is lost on any finish beyond either wing. It is symmetric — a small, known cost whichever way you miss.
The BWB asks a different question: what if you’re confident in one direction? Skipping a strike on the far wing means the embedded credit spread you’re selling (105/115 in the example below) is wider than the debit spread you’re buying (100/105), so it brings in more premium. That extra premium pays for the whole structure. The cost of this financing is that the skipped strike opens a hole: between the short strikes and the far wing, the two short calls outrun your one long call, and losses accumulate until the far wing finally caps them.
In intrinsic-value terms at expiration: below 100 every option expires worthless and you keep (or pay) roughly nothing; at 105 the long 100-call is worth $5 while everything else expires worthless — the peak; above 115 the structure nets out to the skipped width, the one region where being very wrong costs real money.
Example
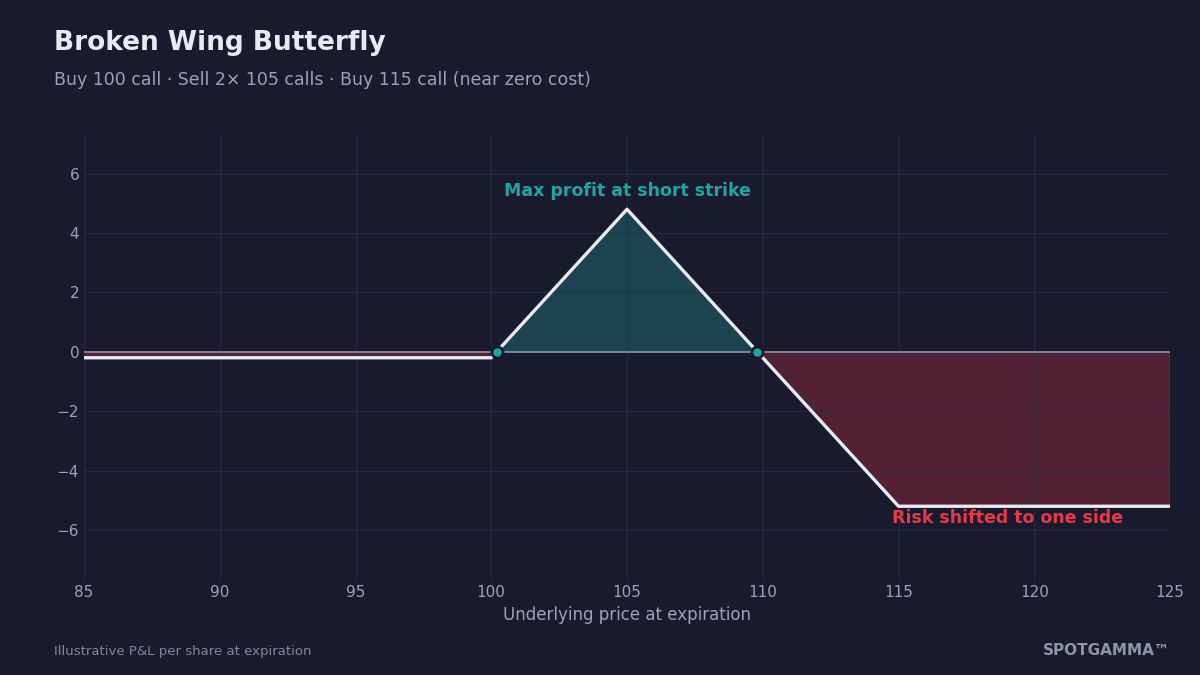
With the stock at $100:
- Buy one $100 call.
- Sell two $105 calls.
- Buy one $115 call — skipping the $110 strike.
- Net cost: roughly zero (a $0.20 debit in this example).
Maximum profit is about $480 with the stock pinned at $105 at expiration. If the stock falls — to $95, $90, anywhere — the position expires worthless and the loss is just the $20 paid, effectively nothing. The risk zone sits above roughly $110: there the second short call is deep enough in the money that the position loses, up to a cap set by the $115 wing. One pin target, one free side, one well-defined danger zone — see the shape for yourself by building it in SpotGamma’s free Options Calculator.
Broken Wing Butterfly vs. Related Strategies
- Vs. a regular butterfly spread: the symmetric fly costs a debit and loses it on either side; the BWB trades that symmetry for financing — free on one side, real risk on the other.
- Vs. a ratio spread: a 1×2 front ratio is a BWB without the far wing — same pin-and-credit idea, but naked, open-ended risk on a runaway move. The BWB’s wing is the insurance the ratio skips.
- Vs. a bear call spread: both can be net-credit bets against a big rally; the BWB adds the long 100/105 spread so that a moderate rally to the body is not merely survived but is the best case.
Using Positioning Data to Trade It Better
A BWB is two decisions — where the pin is, and where you can afford to park the risk — and both map directly onto dealer positioning. Like the rest of our options strategy library, the data replaces guesswork:
- Center the body on a sticky strike. Strikes carrying heavy gamma and open interest have historically acted like magnets into expiration — the same logic as the symmetric fly. The body at a high-gamma strike is the pin thesis, stated in data.
- Put the risk zone beyond the Call Wall. The Call Wall marks where dealer long gamma has historically stalled rallies. A BWB whose far wing — and therefore whose entire loss region — sits outside the wall parks the danger exactly where the market’s own resistance map says price struggles to go.
- Stand aside when gamma flips negative. In negative-GEX regimes moves extend and walls break more readily — precisely the tape that runs through your risk zone instead of pinning at your body.
Risks
- The risk zone is real: a strong rally through the skipped strike produces losses several times the cost of the trade, capped only at the far wing.
- “Free” isn’t free intraday — before expiration the position can mark against you on a fast move toward the short strikes, especially with an IV spike.
- Two short options mean assignment risk once the 105s go in the money, particularly around ex-dividend dates.
- Four legs, four spreads: execute as a single package with limit orders; paying up on entry can quietly turn a zero-cost structure into a debit with the same risk.
FAQ
How is a broken wing butterfly different from a regular butterfly?
A regular butterfly has equidistant wings and costs a debit that can be lost on either side. The BWB sets one wing wider — skipping a strike — which brings in enough extra credit to make the trade roughly free, at the price of concentrating all the risk on the wide-wing side.
Why is there no downside risk?
Because the position costs roughly nothing to open. If the stock falls, every call in a call BWB expires worthless and the trader simply keeps (or forfeits) the trivial net premium — there is no debit of consequence to lose and no short exposure below the body.
Where is the risk in a BWB?
Between the short strikes and the far wing — above roughly $110 in the 100/105/115 example. In that zone the two short calls overpower the long calls, with the maximum loss hit at the far wing, where the long $115 call finally caps the damage.
This article is for educational purposes only and is not financial advice. Options involve substantial risk and are not suitable for all investors.